omktg
Active Member
CLICK HERE FOR THE UPDATE: Adding Your Facebook Pixel and Track Pixel Events OnClick on your store tutorial
Hi guys,
I have seen that some of you have trouble adding the Facebook Pixel to your themes. So I did this little tutorial on how to do it after the last update of the Themes.
Maybe it is easier to create custom conversions in your Ads Manager, instead of using standard events. For this you only need to place your pixel code in your site first [explained below]. The advantage is that you dont need to add any events later.
Here is an example on how to create a custom event inside FB Events Manager:
https://business.facebook.com/events_manager/
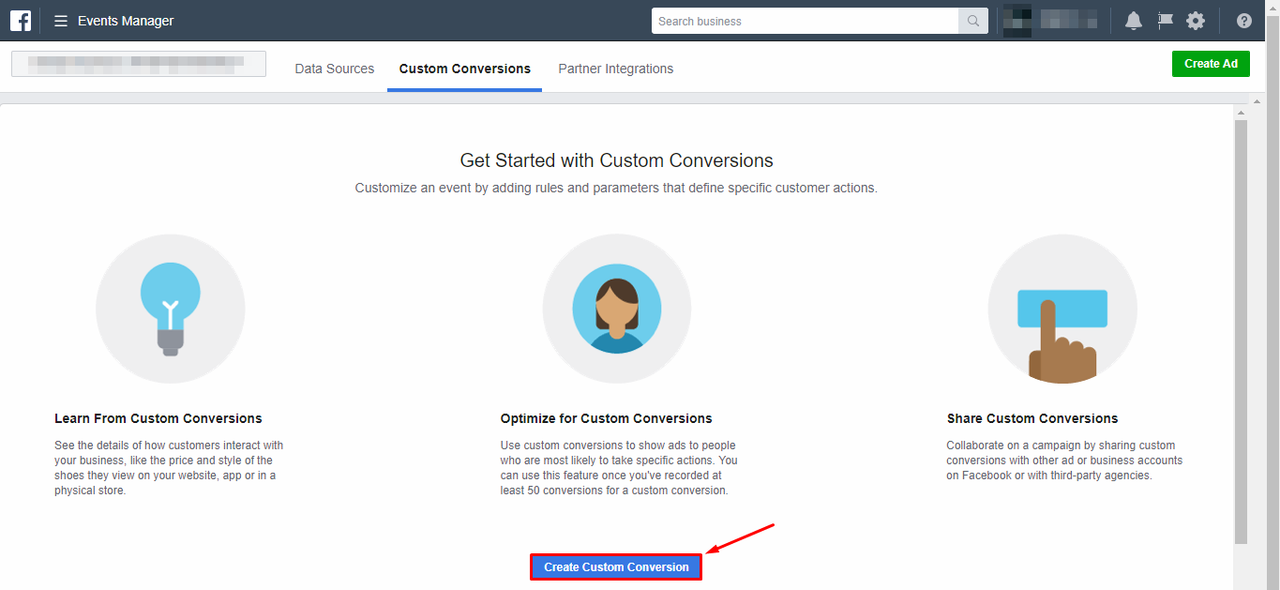
Click on Custom Conversions.

Click on Create Custom Conversion.
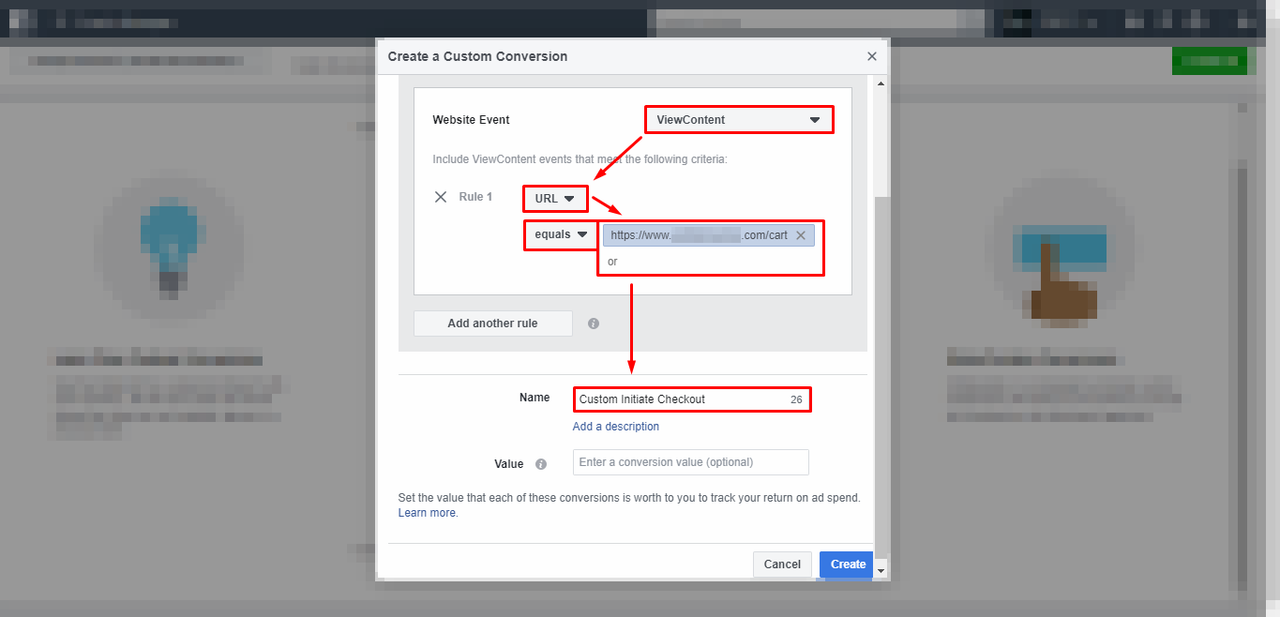
And we are going to create an example here:
For this test, i picked the ViewContent Event, but if you are not going to place any standard event codes in your site, choose the PageView event there because it is the default event inside the FB Pixel.
As you can see in the image, you can create custom conversions based on URLs and Rules, so in the example, I created a custom conversion, that is pretty much the same as the InitiateCheckout standard one, because it is my sites cart URL. I even named it "Custom Initiate Checkout"
So every time a user lands in the cart page, this event will track the visitor.
So play with it a little... you dont need to use the equals rule if you dont want to. For example for product pages you can use the contains rule, and in that case instead of the entire URL or your site, you will put there just the product page URL:
Imagine your product page is:
http://raphael.alidropship.com/virgin-mary-leather-bracelet/
So if you use the URL contains rule, you only need to place: virgin-mary-leather-bracelet there, instead of the full site.
Now, for the ones that prefer to add the standard events to your site:
This is a quick way to add the pixel and some standard events, without the need to modify the code. Those who know another way to do it, feel free to comment and help others to solve all the problems they have regarding this...
To begin, you must log in to Facebook, and then go to your Ads Manager:
Facebook Ads Manager: Personal Account
https://www.facebook.com/adsmanager/
Facebook Business Manager:
https://business.facebook.com/
Select your AD account [You need an ad account to get your pixel... 1 pixel per ad account]
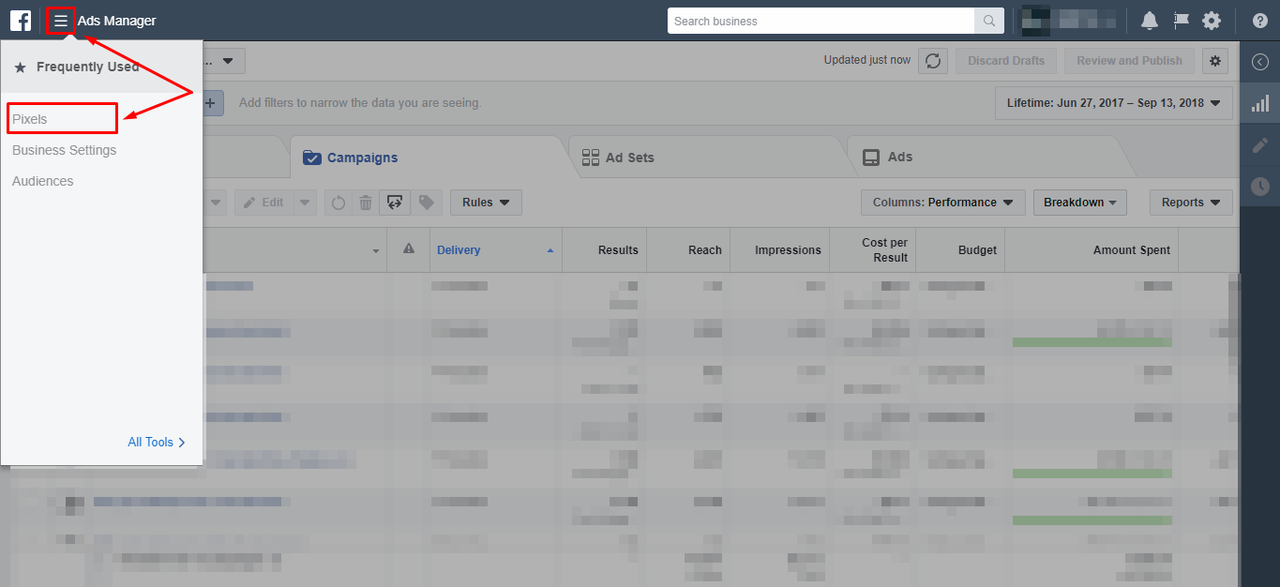
And finally, inside your ads manager click on the left menu, and click on Pixels [Like in the image]
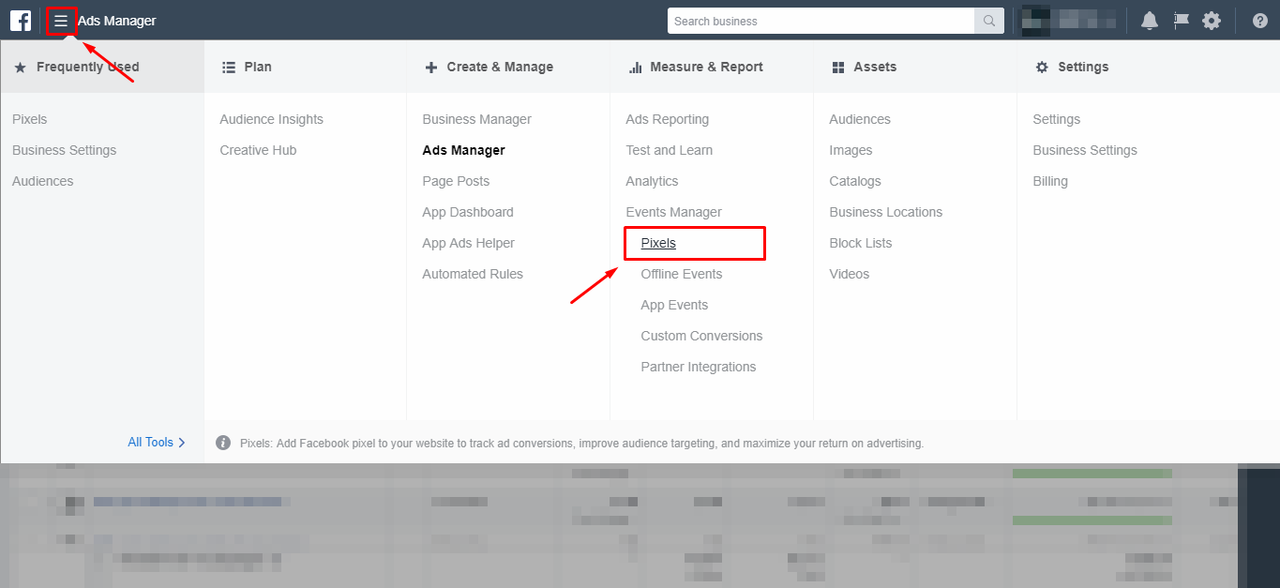
If you dont see the Pixel link at the left, just click the "All Tool" link at the bottom, and you will find it under Measure & Report.
In you Pixels page, click on the "Details" button [If you never created a Pixel before, you will see an step by step tutorial here instead... just follow it and create your pixel, It looks a lot like the images you will see next]

Once in the Details Page, click on the "Set Up" button to get your Pixel.

Then select the option "Manually Install the Code Yourself"
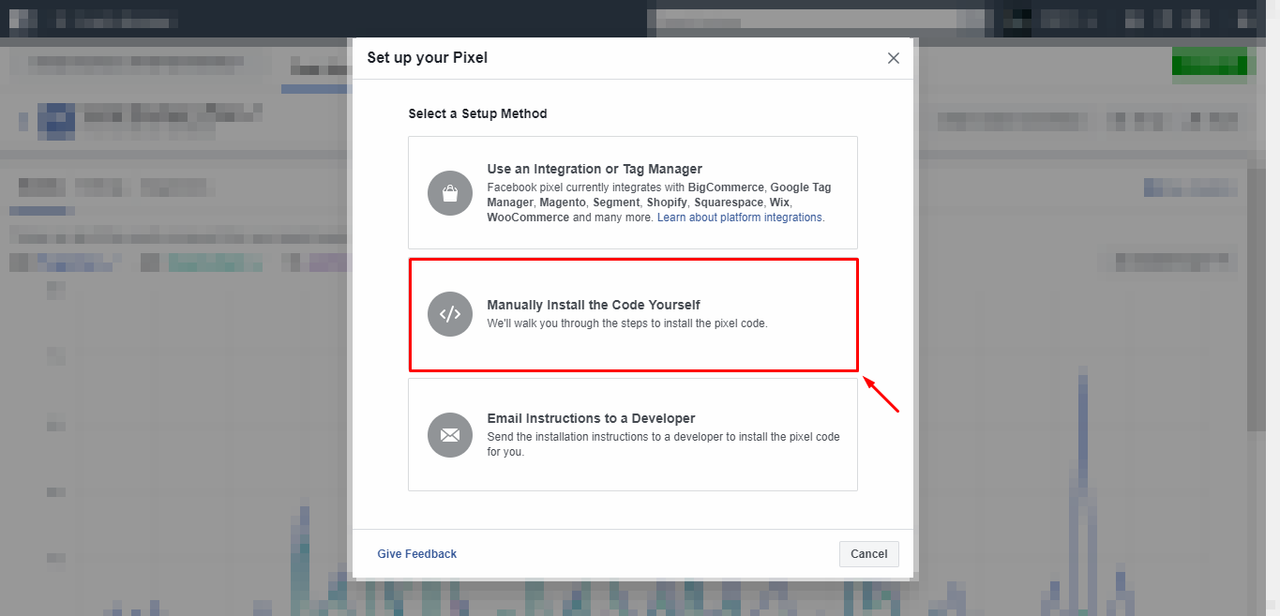
Now copy your Pixel code [this code is the same for everyone, the only thing that changes is your Account ID]
So if you already know your ID, I have copied that code and events for you below... just copy the code to a notepad, and add your ID number where it says REPLACE:
<!-- Facebook Pixel Code -->
<script>
!function(f,b,e,v,n,t,s)
{if(f.fbq)return;n=f.fbq=function(){n.callMethod?
n.callMethod.apply(n,arguments):n.queue.push(arguments)};
if(!f._fbq)f._fbq=n;n.push=n;n.loaded=!0;n.version='2.0';
n.queue=[];t=b.createElement(e);t.async=!0;
t.src=v;s=b.getElementsByTagName(e)[0];
s.parentNode.insertBefore(t,s)}(window, document,'script',
'https://connect.facebook.net/en_US/fbevents.js');
fbq('init', 'REPLACE');
fbq('track', 'PageView');
</script>
<noscript><img height="1" width="1" style="display:none"
src="https://www.facebook.com/tr?id=REPLACE&ev=PageView&noscript=1"
/></noscript>
<!-- End Facebook Pixel Code -->
Here are the events we are going to use [ViewContent, InitiateCheckout, Purchase, NOPurchase]
<!-- Facebook View Content -->
<script>
fbq('track', 'ViewContent');
</script>
<!-- End Facebook View Content -->
<!-- Facebook Initiate Checkout -->
<script>
fbq('track', 'InitiateCheckout');
</script>
<!-- End Facebook Initiate Checkout -->
<!-- Facebook Purchase -->
<script>
fbq('track', 'Purchase');
</script>
<!-- End Facebook Purchase -->
<!-- Facebook NOPurchase -->
<script>
fbq('trackCustom', 'NOPurchase');
</script>
<!-- End Facebook NOPurchase -->
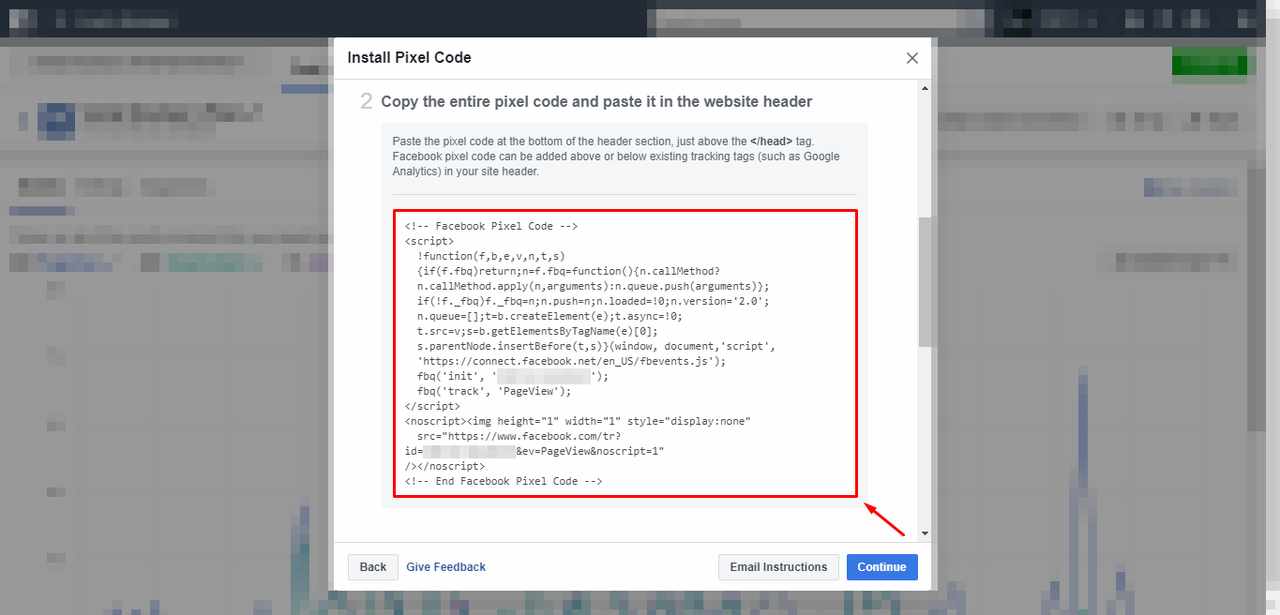
Once you have copied your pixel code, just click "Continue" to get your Events [In the Events window, turn on View Content, Initiate Checkout, and Purchase]
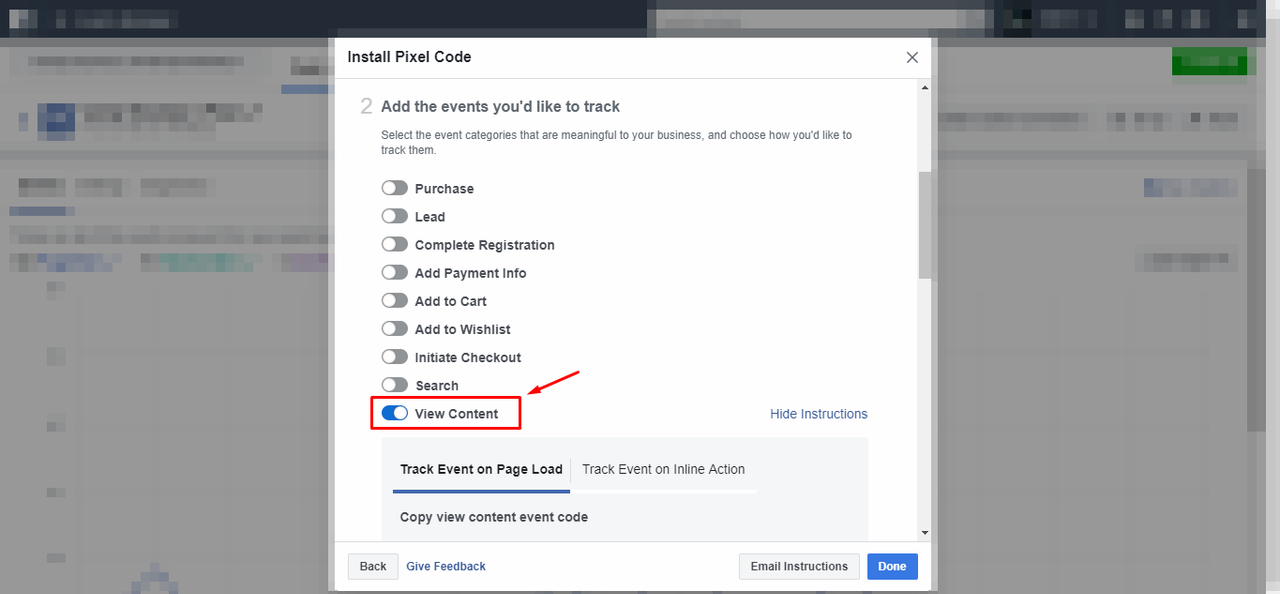
Now Copy each event code, and paste them into a text file. In the example image you can see the ViewContent event code.
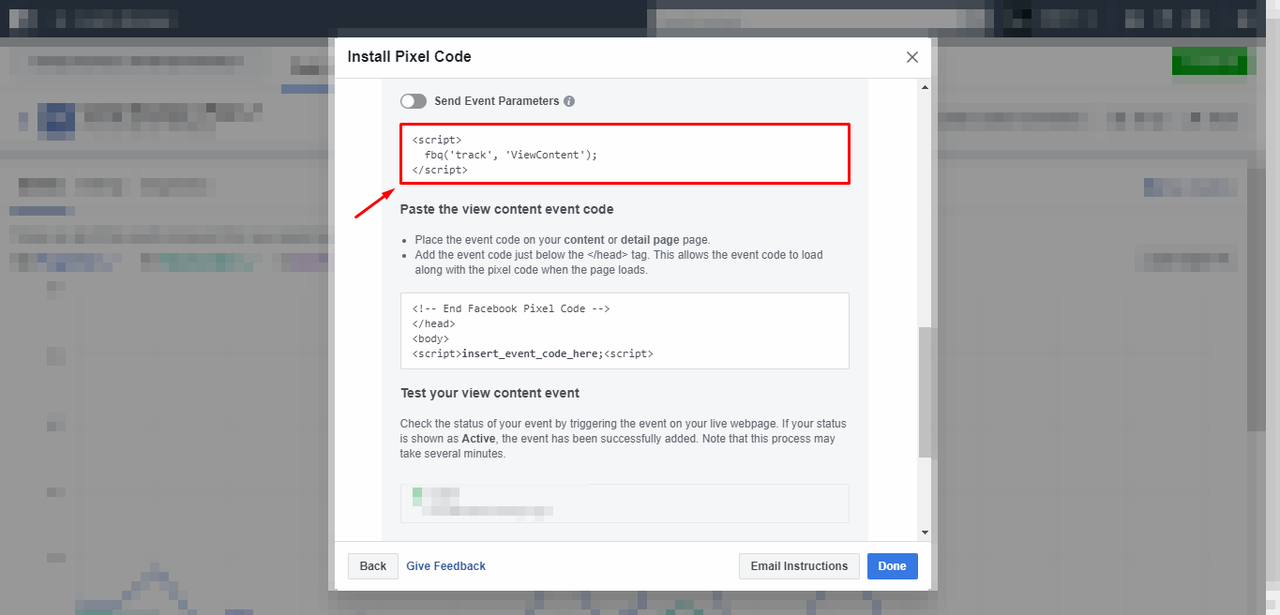
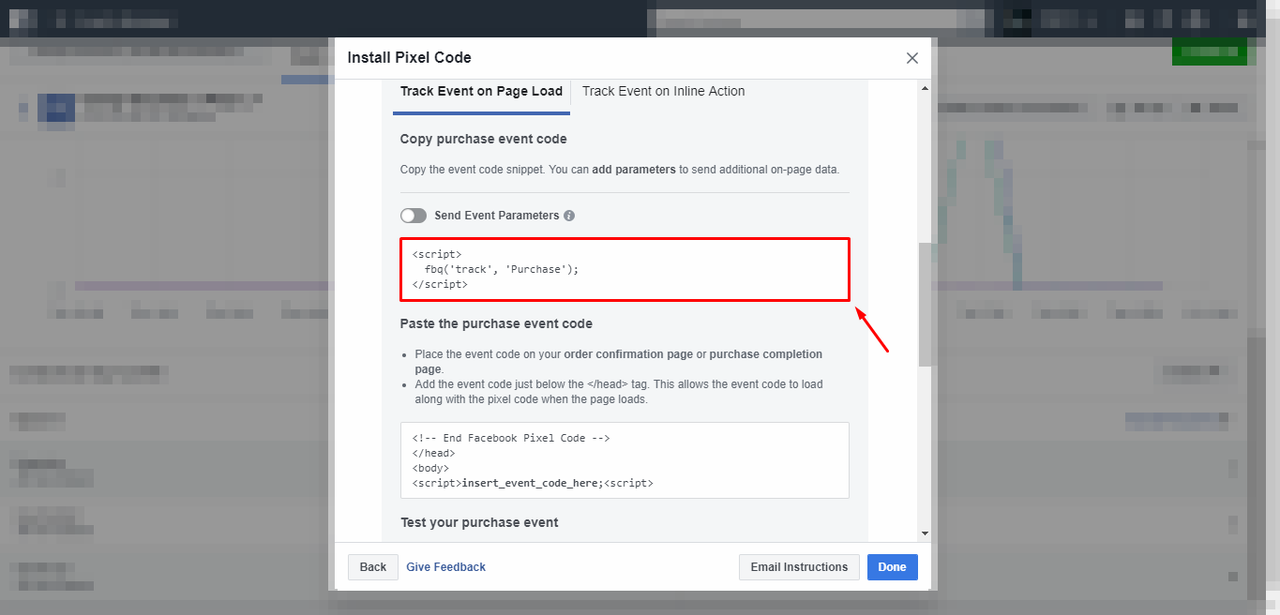
Here is the Purchase event code.
Click here to read the second part: [It looks that i cant add more that 1000 characters in a single post here]
https://forum.alidropship.com/threa...-pixel-to-your-alidropship-theme-part-2.7813/
Hi guys,
I have seen that some of you have trouble adding the Facebook Pixel to your themes. So I did this little tutorial on how to do it after the last update of the Themes.
Maybe it is easier to create custom conversions in your Ads Manager, instead of using standard events. For this you only need to place your pixel code in your site first [explained below]. The advantage is that you dont need to add any events later.
Here is an example on how to create a custom event inside FB Events Manager:
https://business.facebook.com/events_manager/
Click on Custom Conversions.

Click on Create Custom Conversion.

And we are going to create an example here:
For this test, i picked the ViewContent Event, but if you are not going to place any standard event codes in your site, choose the PageView event there because it is the default event inside the FB Pixel.
As you can see in the image, you can create custom conversions based on URLs and Rules, so in the example, I created a custom conversion, that is pretty much the same as the InitiateCheckout standard one, because it is my sites cart URL. I even named it "Custom Initiate Checkout"
So every time a user lands in the cart page, this event will track the visitor.
So play with it a little... you dont need to use the equals rule if you dont want to. For example for product pages you can use the contains rule, and in that case instead of the entire URL or your site, you will put there just the product page URL:
Imagine your product page is:
http://raphael.alidropship.com/virgin-mary-leather-bracelet/
So if you use the URL contains rule, you only need to place: virgin-mary-leather-bracelet there, instead of the full site.

Now, for the ones that prefer to add the standard events to your site:
This is a quick way to add the pixel and some standard events, without the need to modify the code. Those who know another way to do it, feel free to comment and help others to solve all the problems they have regarding this...
To begin, you must log in to Facebook, and then go to your Ads Manager:
Facebook Ads Manager: Personal Account
https://www.facebook.com/adsmanager/
Facebook Business Manager:
https://business.facebook.com/
Select your AD account [You need an ad account to get your pixel... 1 pixel per ad account]
And finally, inside your ads manager click on the left menu, and click on Pixels [Like in the image]

If you dont see the Pixel link at the left, just click the "All Tool" link at the bottom, and you will find it under Measure & Report.

In you Pixels page, click on the "Details" button [If you never created a Pixel before, you will see an step by step tutorial here instead... just follow it and create your pixel, It looks a lot like the images you will see next]

Once in the Details Page, click on the "Set Up" button to get your Pixel.

Then select the option "Manually Install the Code Yourself"

Now copy your Pixel code [this code is the same for everyone, the only thing that changes is your Account ID]
So if you already know your ID, I have copied that code and events for you below... just copy the code to a notepad, and add your ID number where it says REPLACE:
<!-- Facebook Pixel Code -->
<script>
!function(f,b,e,v,n,t,s)
{if(f.fbq)return;n=f.fbq=function(){n.callMethod?
n.callMethod.apply(n,arguments):n.queue.push(arguments)};
if(!f._fbq)f._fbq=n;n.push=n;n.loaded=!0;n.version='2.0';
n.queue=[];t=b.createElement(e);t.async=!0;
t.src=v;s=b.getElementsByTagName(e)[0];
s.parentNode.insertBefore(t,s)}(window, document,'script',
'https://connect.facebook.net/en_US/fbevents.js');
fbq('init', 'REPLACE');
fbq('track', 'PageView');
</script>
<noscript><img height="1" width="1" style="display:none"
src="https://www.facebook.com/tr?id=REPLACE&ev=PageView&noscript=1"
/></noscript>
<!-- End Facebook Pixel Code -->
Here are the events we are going to use [ViewContent, InitiateCheckout, Purchase, NOPurchase]
<!-- Facebook View Content -->
<script>
fbq('track', 'ViewContent');
</script>
<!-- End Facebook View Content -->
<!-- Facebook Initiate Checkout -->
<script>
fbq('track', 'InitiateCheckout');
</script>
<!-- End Facebook Initiate Checkout -->
<!-- Facebook Purchase -->
<script>
fbq('track', 'Purchase');
</script>
<!-- End Facebook Purchase -->
<!-- Facebook NOPurchase -->
<script>
fbq('trackCustom', 'NOPurchase');
</script>
<!-- End Facebook NOPurchase -->

Once you have copied your pixel code, just click "Continue" to get your Events [In the Events window, turn on View Content, Initiate Checkout, and Purchase]

Now Copy each event code, and paste them into a text file. In the example image you can see the ViewContent event code.

Here is the Purchase event code.

Click here to read the second part: [It looks that i cant add more that 1000 characters in a single post here]
https://forum.alidropship.com/threa...-pixel-to-your-alidropship-theme-part-2.7813/
Last edited:
